Example: JSON Web Tokens with Vanilla JavaScript
In this post we're going to learn how to use JSON web tokens on the frontend with vanilla JavaScript and no libraries necessary. What you learn will be easily applicable to frameworks such as Angular, Angular2, Vue.js or similar.
In the last post we had a look at how to create an express app with jwt authentication.
Why No Framework?
I wanted to write a post simply illustrating how everything works and how easily this can be achieved without any frameworks in place. It's just another layer of abstraction you have to learn if you're just trying to build some sort of login for your web app.Changes to the Backend
In order to serve an HTML page in the browser, I have changed the backend code slightly:app.use(express.static('public'));
app.get("/", function(req, res) {
res.sendFile(process.cwd() + '/public/index.html');
});
Also I of course have created the directory public and the files inside: index.html and jwt-vanilla.js.
The HTML part
We're just going to serve a very basic and unstyled page for our educational purposes:<!DOCTYPE html>
<html lang="en">
<head>
<meta charset="UTF-8">
<title>JSON web token with vanilla js</title>
</head>
<body>
<div class="input">
<label for="username">user name:</label>
<input id="username">
<label for="password">password:</label>
<input id="password">
<button onclick="getToken()">login</button>
</div>
<div id="token"></div>
<button onclick="getSecret()">get secret message</button>
<div id="result"></div>
<script src="jwt-vanilla.js"></script>
</body>
</html>
Notice that we have two buttons that will each run a different function of the included JavaScript file, getToken and getSecret.
The vanilla JavaScript JWT part
In order to get our token, we create a POST request with the username and password that is accessible to our backend. Remember we set it to a static array in the last post and we have a user that's calledtest with the password test.
// make the request to the login endpoint
function getToken() {
var loginUrl = "http://localhost:3000/login"
var xhr = new XMLHttpRequest();
var userElement = document.getElementById('username');
var passwordElement = document.getElementById('password');
var tokenElement = document.getElementById('token');
var user = userElement.value;
var password = passwordElement.value;
xhr.open('POST', loginUrl, true);
xhr.setRequestHeader('Content-Type', 'application/json; charset=UTF-8');
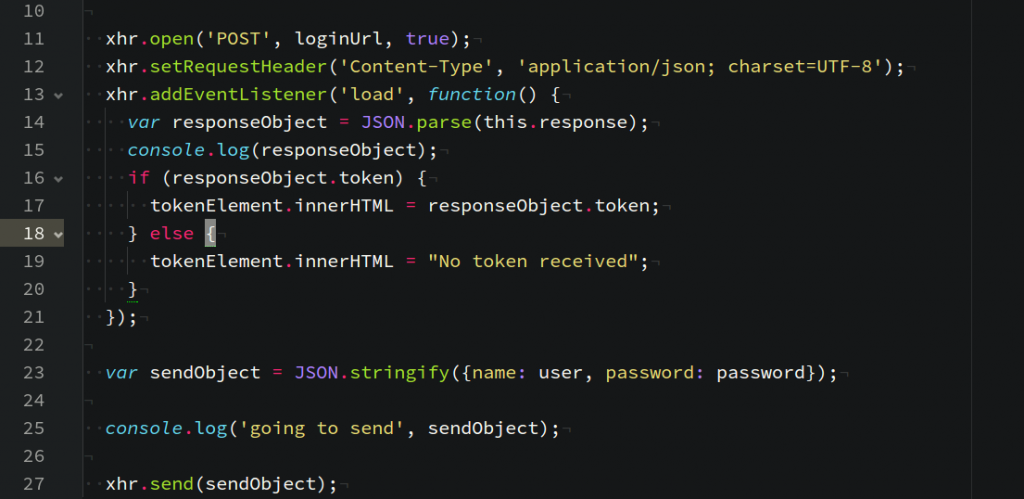
xhr.addEventListener('load', function() {
var responseObject = JSON.parse(this.response);
console.log(responseObject);
if (responseObject.token) {
tokenElement.innerHTML = responseObject.token;
} else {
tokenElement.innerHTML = "No token received";
}
});
var sendObject = JSON.stringify({name: user, password: password});
console.log('going to send', sendObject);
xhr.send(sendObject);
}
The function will be called when the user clicks the respective button, get user name and password from the input fields and if they are valid credentials, we'll display the token on the HTML page. Notice that we're setting the content type to application/json and that we're using JSON.parse to read the response and log it to the console. Typically you would now save the token in localStorage or another convenient place for future requests.
The next function we write is the one to get access to the data that should be kept private by the API and only communicated to logged in users, those who have a token:
// make the request to the secret API endpoint
function getSecret() {

  var url = "http://localhost:3000/secret"
  var xhr = new XMLHttpRequest();
  var tokenElement = document.getElementById('token');
  var resultElement = document.getElementById('result');
  xhr.open('GET', url, true);
  xhr.setRequestHeader("Authorization", "JWT " + tokenElement.innerHTML);
  xhr.addEventListener('load', function() {
    var responseObject = JSON.parse(this.response);
    console.log(responseObject);
    resultElement.innerHTML = this.responseText;
  });

  xhr.send(null);
}
This request is a GET request, like in our previous Postman example, in order to set the Authorization header for the xhr request, we use .setRequestHeader and set the value to JWT and append the token value we've stored in the #token element on the page.
Notice that for this request, we're sending null, because GET requests don't have a body of data to be transmitted, but simply go to a URL.
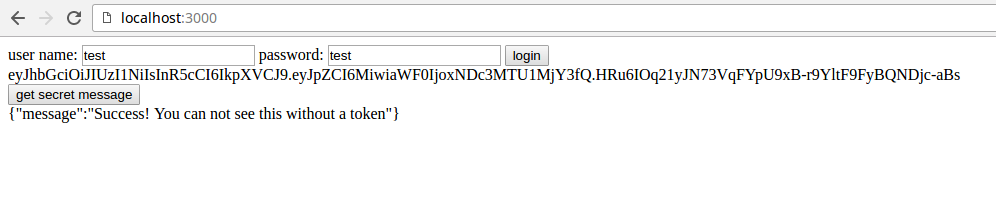
If everything went well, you should see something like the following in your browser:
To save the token in your browser you can simply use:
localStorage.setItem('token', token);
and later access it with:
localStorage.getItem('token');